Voyeuristic Beekeeping

Today we announced public access to what the beekeeping community has been talking about for over a year: Beekeeping.io’s map of active apiaries from around the world called BeeCounted.org. These apiary owners are taking hive readings, and uploading them to beekeeping.io so they can be displayed on this map. Adding dozens of apiaries every month, this map is the largest, current data set of live apiary data in the world.

If you’d like to add your apiary, you can get sensors from www.broodminder.com, and use their app to upload your data. The basic features of beekeeping.io are free, including uploading all the data you’d like.


Categories: Bees | 2 Comments

Clicking Noise in the Hive


I opened one of the hives today to replace a feeder, and heard a strange sound. Not the usual buzzing, but something more like clicking. Someone described it as a crisp dollar bill being crumpled, but I’d describe it as a geiger counter on the other side of the room (OK, maybe you haven’t heard one of those). A bit of googling showed I shouldn’t be alarmed, and it was probably bees chewing the wood, or building out wax. Since I’ve had my head in a lot of bee hives and never heard this before, I’m puzzled, but I’d go with the chewing wood theory.

Play the video and tell me what you think it is in the comments. And pardon the blurry video – it’s the sound you should be paying attention to.

Categories: Bees | 1 Comment

Not Dead Yet

TNo Dead yetoughest-cluster-ever.

I checked on the last colony I had – the only one that survived over the harsh weather. They were so small, I almost missed them. Clustered between the wall and a piece of comb, I saw them. Dead. I can’t say I was surprised. So, thinking that this time I was going to be smart, and send a few to Beltsville, I carefully carried the feeding box into the garage so I could find a test tube, and peel off a few. As I walked across my lawn, I saw a few wings fluttering, and marveled at how their tiny translucent sheets caught the wind even in death.

After I grabbed the test tube and flat head screw driver, I bent down to push a few in – and they pushed back! Suddenly a few came to life, clearly agitated that I had disturbed their mini-cluster. While none flew, they crawled all over, flapping their wings as if trying to shout “Not Dead Yet!”.

Stunned, I quickly put them back in their hive, placed some sugar near them, and hoped for the best. It’s still in the 40-50s on the Cape on May 2nd, but but the temperatures are rising, and there early flowers popping up.

Could they actually have survived, and will they built up a healthy colony though the late spring? I’m hoping for the best for these little fighters, but they have a hard road ahead of them.

Categories: Bees | Leave a comment

There’s a Mouse in the House

bees_apilr_18_2015

I went into my last remaining hive today, and the poor girls were barely hanging in there. It was the smallest cluster of bees I’ve ever seen alive, and I was too nervous to touch then and make sure there was a queen under their ball. Knowing how they fight to keep her warm, I think she’s in there, even though it’s 60F outside.

The curious thing is that they seems to not be taking the food I have in there – both syrup and moist sugar, and even some older dried sugar mix from the winter. Since I’d never seen a cluster that small, I started thinking about all the things that would retard their growth. Sickness, poor food, too cold… And then it hit me. Predators.


mouse_in_hive_ailr_18_2015Much to my dismay, I quickly found the culprit on the second level of food I had left them (it’s semi-camoflauged in the upper right corner). A decent size mouse had gotten in during the last week, pooped all over the place and terrified my poor bees. The mouse was dead, my guess from being stung to death.

If you’re first reaction is “why didn’t you have a mouse guard?”, I did. The only entrance was a tiny hole in the upper box, big enough for only two bees to pass at a time. On closer inspection, it had been chewed away to open it just a little, and the mouse had crawled in.

I couldn’t clean the entire hive without disturbing the colony, so I cleaned what I could, and let the girls alone. Hopefully without an intruder they can recover, but I doubt it. Very disappointing.


Categories: Bees | Leave a comment

Hanging In There

I checked the only colony that made it though the winter, and they’re still alive – barely alive. They’d all clustered against the inner cover, clearly desperately trying to keep warm. I found this out by lifting the inner cover up only an inch to peek under it, and didn’t dare take a picture as the colony was only about the size of a lemon.

Fearing the worst, but hoping for the best, I gave them an extra super full of frames on the bottom to prevent any future swarming (I doubt such a weak colony would attempt a swarm), and gave them a mason jar of 2:1 syrup. They had already eaten all the sugar I had left for them, leaving the protein in place.

Later in the day I did see a few foragers returning to the hive. Most looked like they were empty handed, but I was encouraged by seeing one loaded with white pollen.

With the weather predicted to only drop into the 40s(F) at night and 60s(F) in the daytime, I’m hoping the worst of this record-breaking winter is over, and this colony will blossom again.

Categories: Bees | Leave a comment

Making a Candy Board for Winter Feeding

On Cape Cod where I keep my bees, its cold in the winter, with temperatures dipping below freezing in December, and not rising above that until March. If your bees have tons of honey, they may make it though the winter, but if they don’t, you need to feed them. There are no alternatives. Most beekeepers, including myself, feed them even if they have plenty of honey. My favorite way to feed my bees is by making up a candy board, otherwise called “fondant” from the French. It’s just a slurry of sugar and water that’s dried out and forms a hard substance. Think of the icing on a cake, but dried out, so it’s very hard.

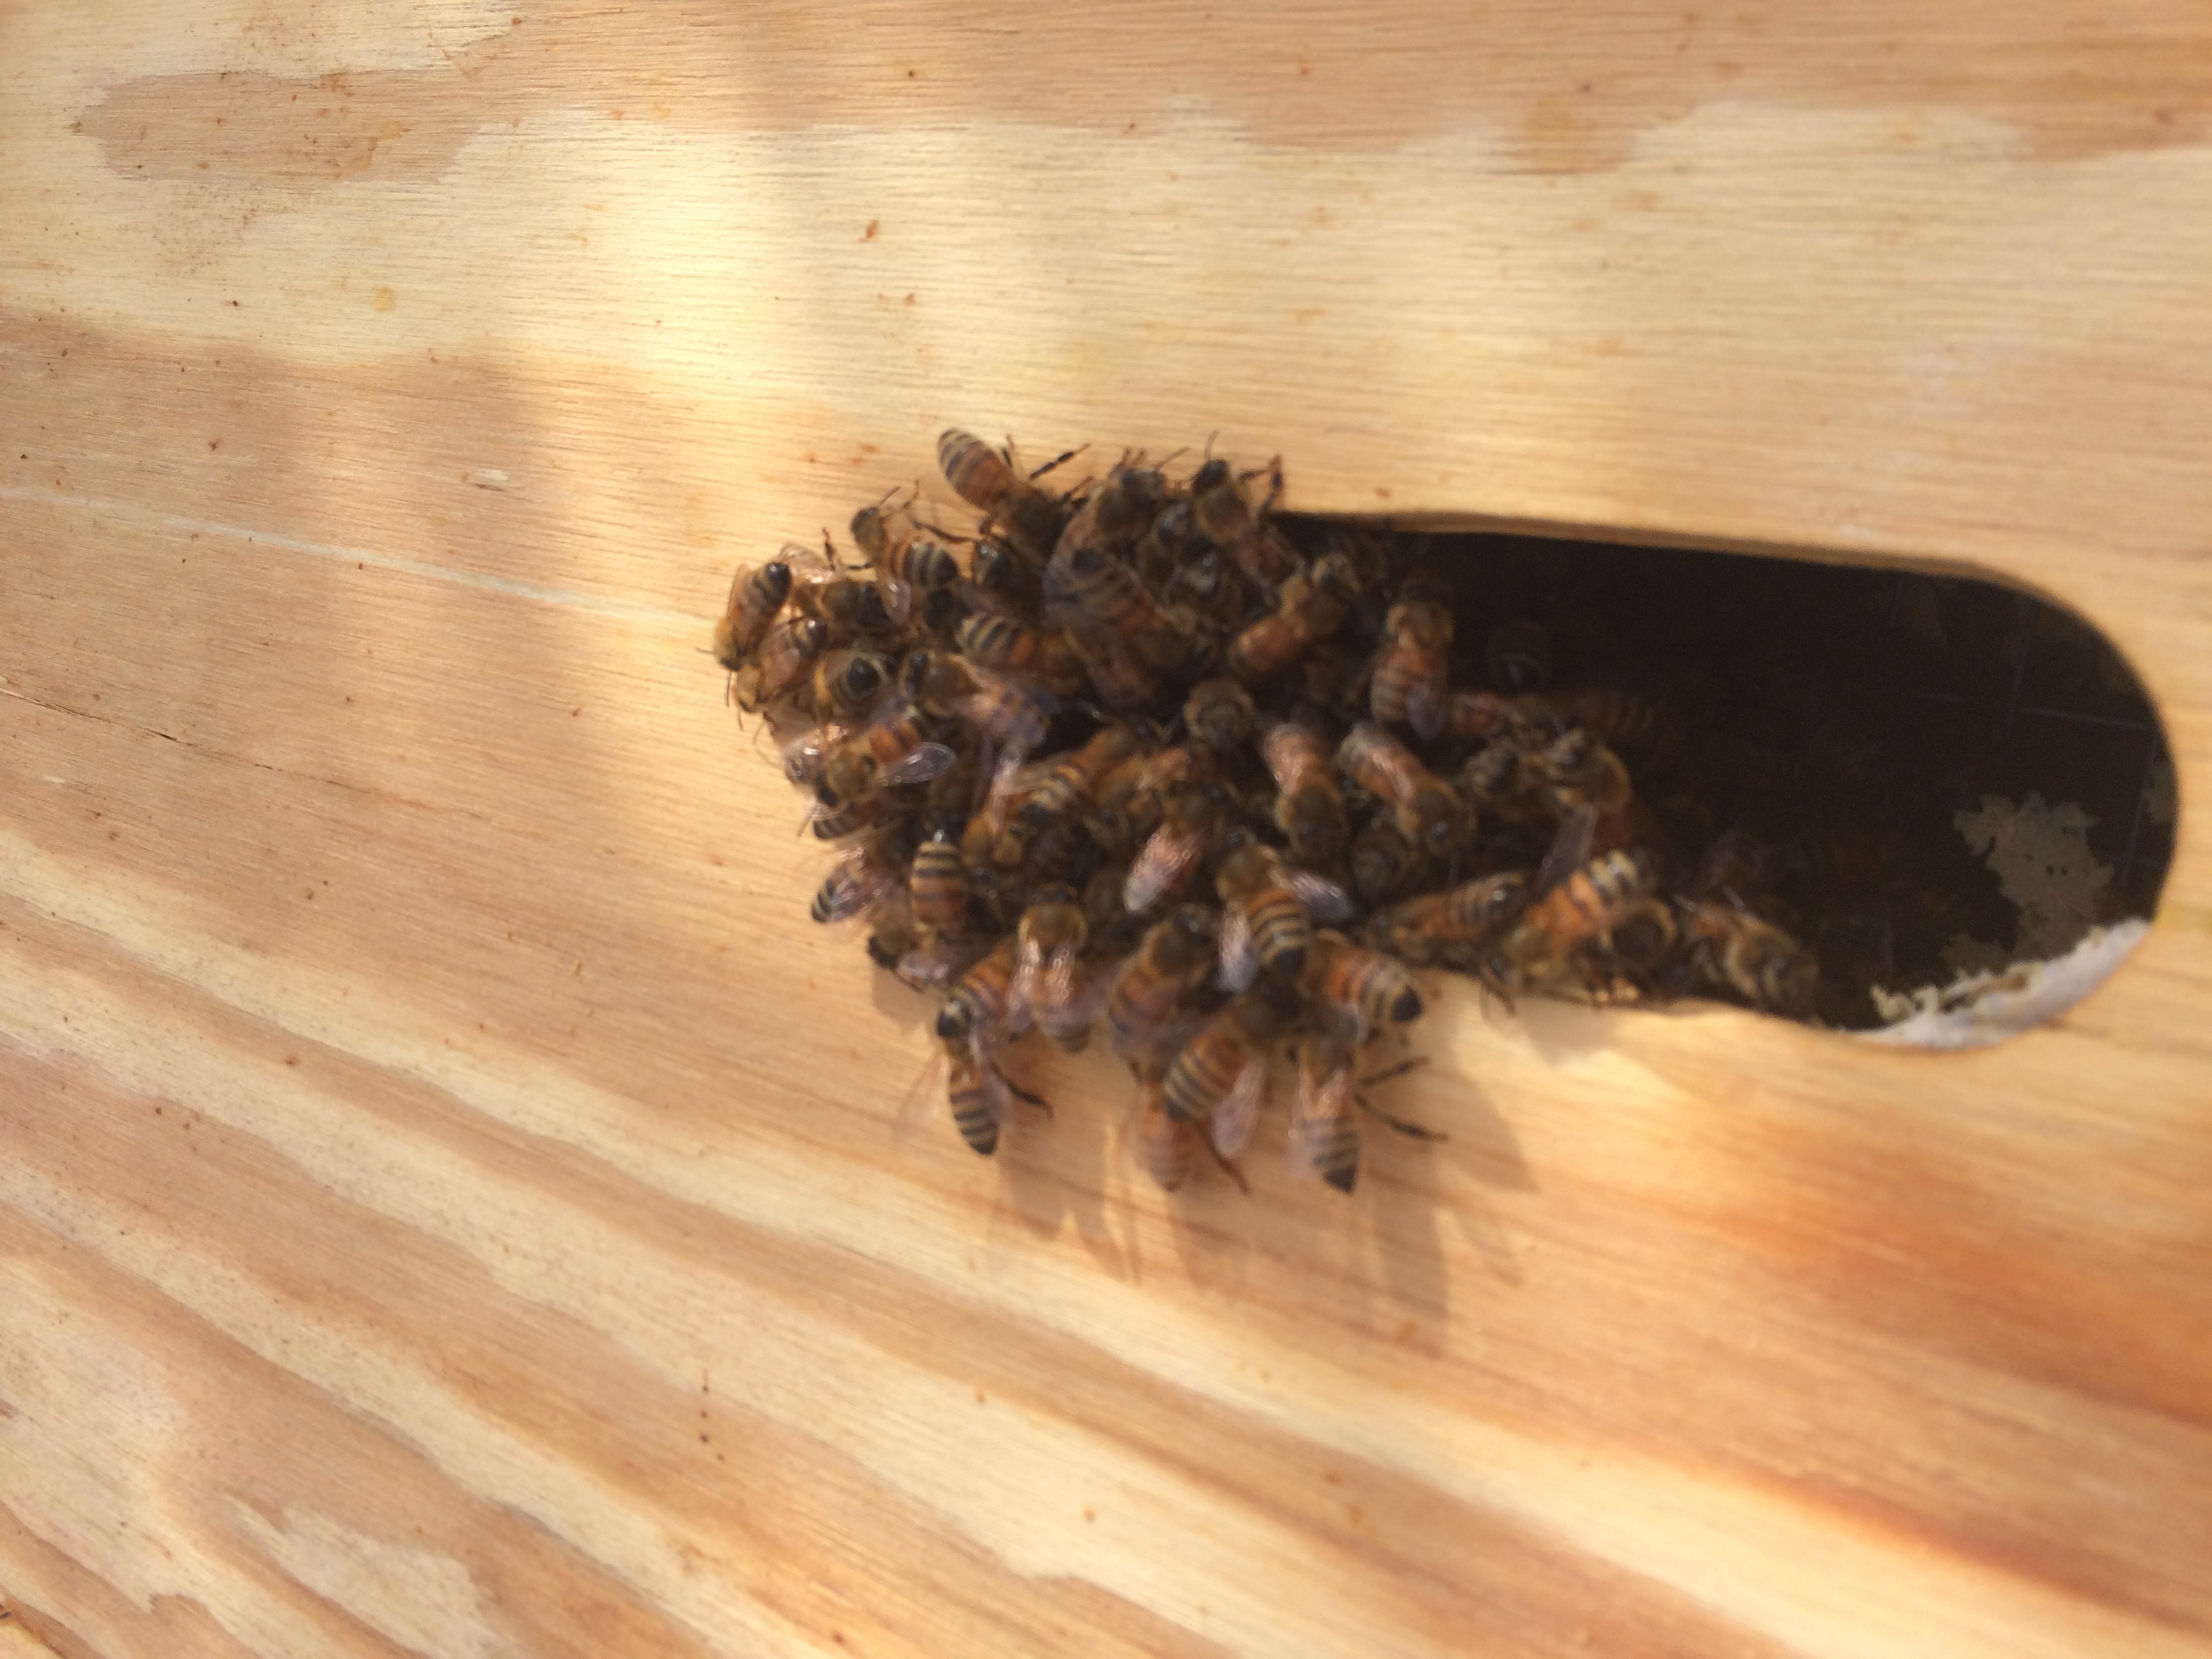
The idea with candy board is that you’re making a block of food right above the frames on the upper super. As the winter gets colder, the bees will move up into the upper super (or should do this), and be close to the food source. They break cluster in the frames, and crawl up to the top of the frames. They find a think sheet of paper and clearly smell the food. They nibble through the paper (easy work for a bee) and find a huge food source the other side. If they don’t need it they won’t take it, but trust me, in the deep winter, they take it.

Candy board isn’t hard to make, but it takes a little planning. Don’t expect do get it all done in an afternoon. The following is the method I use, but it’s certainly not the only method, or the best; I only claim it as the one I like.

A few notes before we get started. Making a candy board requires some simple woodworking, and then some simple mixing of ingredients in a bowl. There is no cooking or flames of any type in my recipe, so even a kid can do it.

Before you start mixing it up, make sure you have a bee hive shim to pour it into. A wooden one about 2 inches high should work, with a 3/8 inch hole to allow for some ventilation, and a bottom made out of chicken wire. The hole is optional if you have another hole at the top of your hive such as a inner cover has. If you don’t want to use a shim, you can use large flat tupperware container to dry the mixture in, pop it out of the tupperware, and place it directly on top of the frames in the hive. But as the bees eat it, it will crumble, and the bees won’t eat what’s fallen to the bottom until the spring – not very efficient.

Wooden shims are made once, and can be used year after year. Even the candy, if not all eaten by the spring, can be placed in tupperware for use next fall. If you keep moisture out of it, it rarely seems to spoil.

Candy being mixed with a gardening spade

So let’s talk about making the candy. First we’ll start out with what you’ll need. When you’re done, you’ll have about 9lbs of candy.

  • 8 lbs of sugar (add this in first)
  • 1 Pollen patty or 1 cup of “MegaBee” powder
  • 1.5 cups water
  • 1 tbsp. plain white vinegar (optional)
  • A big pot. I use a lobster pot (at least a 6 “)
  • 1 Heavy duty metal spoon or garden trowel. A wooden one might break.
  • Takes 48hrs to dry out before it’s ready – plan in advance.

Yes, I know 8 lbs of sugar (usually two bags, but check – some are 5 lbs) is a lot of sugar. But bees need two things, carbs and protein, and sugar will suffice as the carbs in a pinch. The water helps you mix it all together, and then the drying allows it to form a solid block.

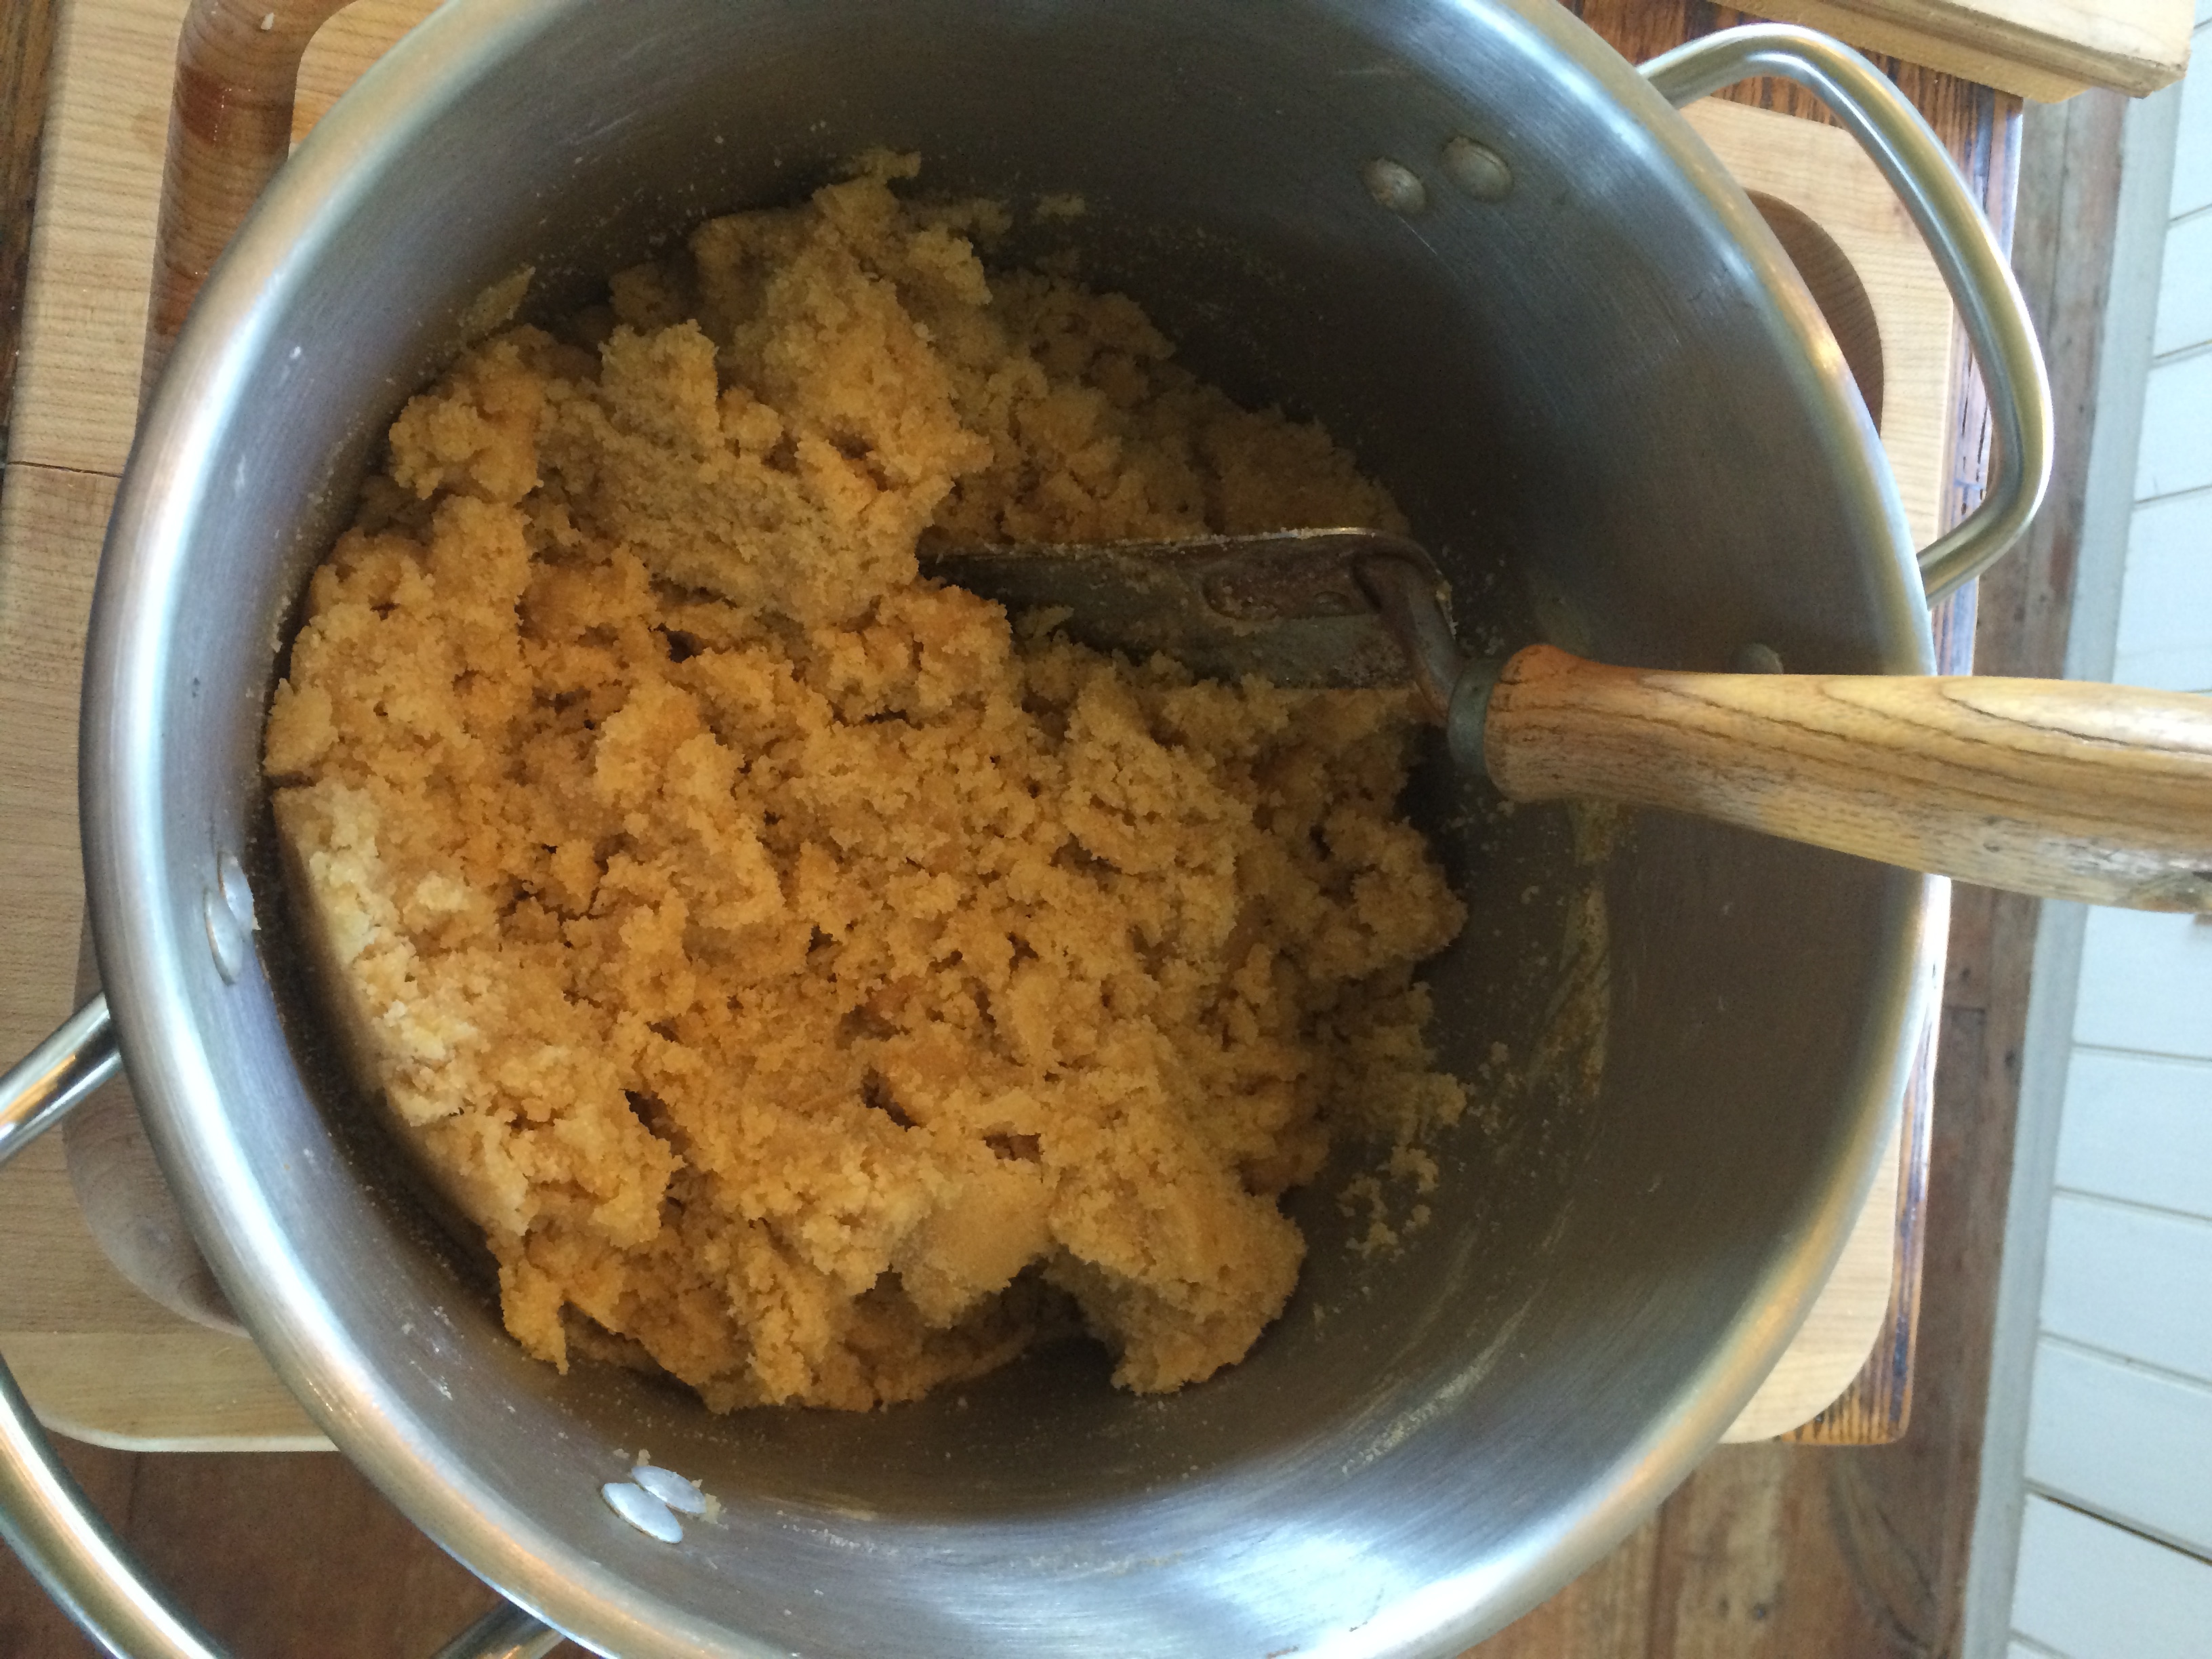
Start by putting all the sugar in a large bowl, or in my case a lobster pot. Don’t use a small mixing bowl as this is a lot of ingredients. Add in a crumbled pollen patty, or 1 cup of MegaBee powder¹. Give it a few good stirs with a large, study, metal cooking spoon or a metal garden trowel. You’ll need some serious muscle to mix it when wet, so do it when it’s dry just to distribute the pollen or MegaBee powder.

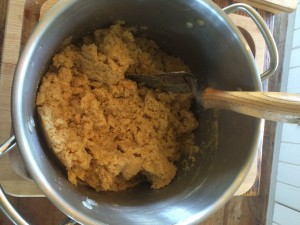
Next start adding in the water. I usually do 1/2 cup at a time, and then stir. Then add in the other cup of water (making 1.5 cups total) 1/2 cup at a time, and the vinegar² (optional). As you add in the liquid, you’re going to get a heavy paste, and it’s going to get a lot harder to stir. If you have a really strong kitchen mixer you can try it, but I do it by hand so I don’t break the mixer. Stir until all the water is absorbed by the sugar. When it’s ready, it should be as thick as wet sand.

Prepping the candy boardCandy board drying
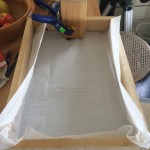
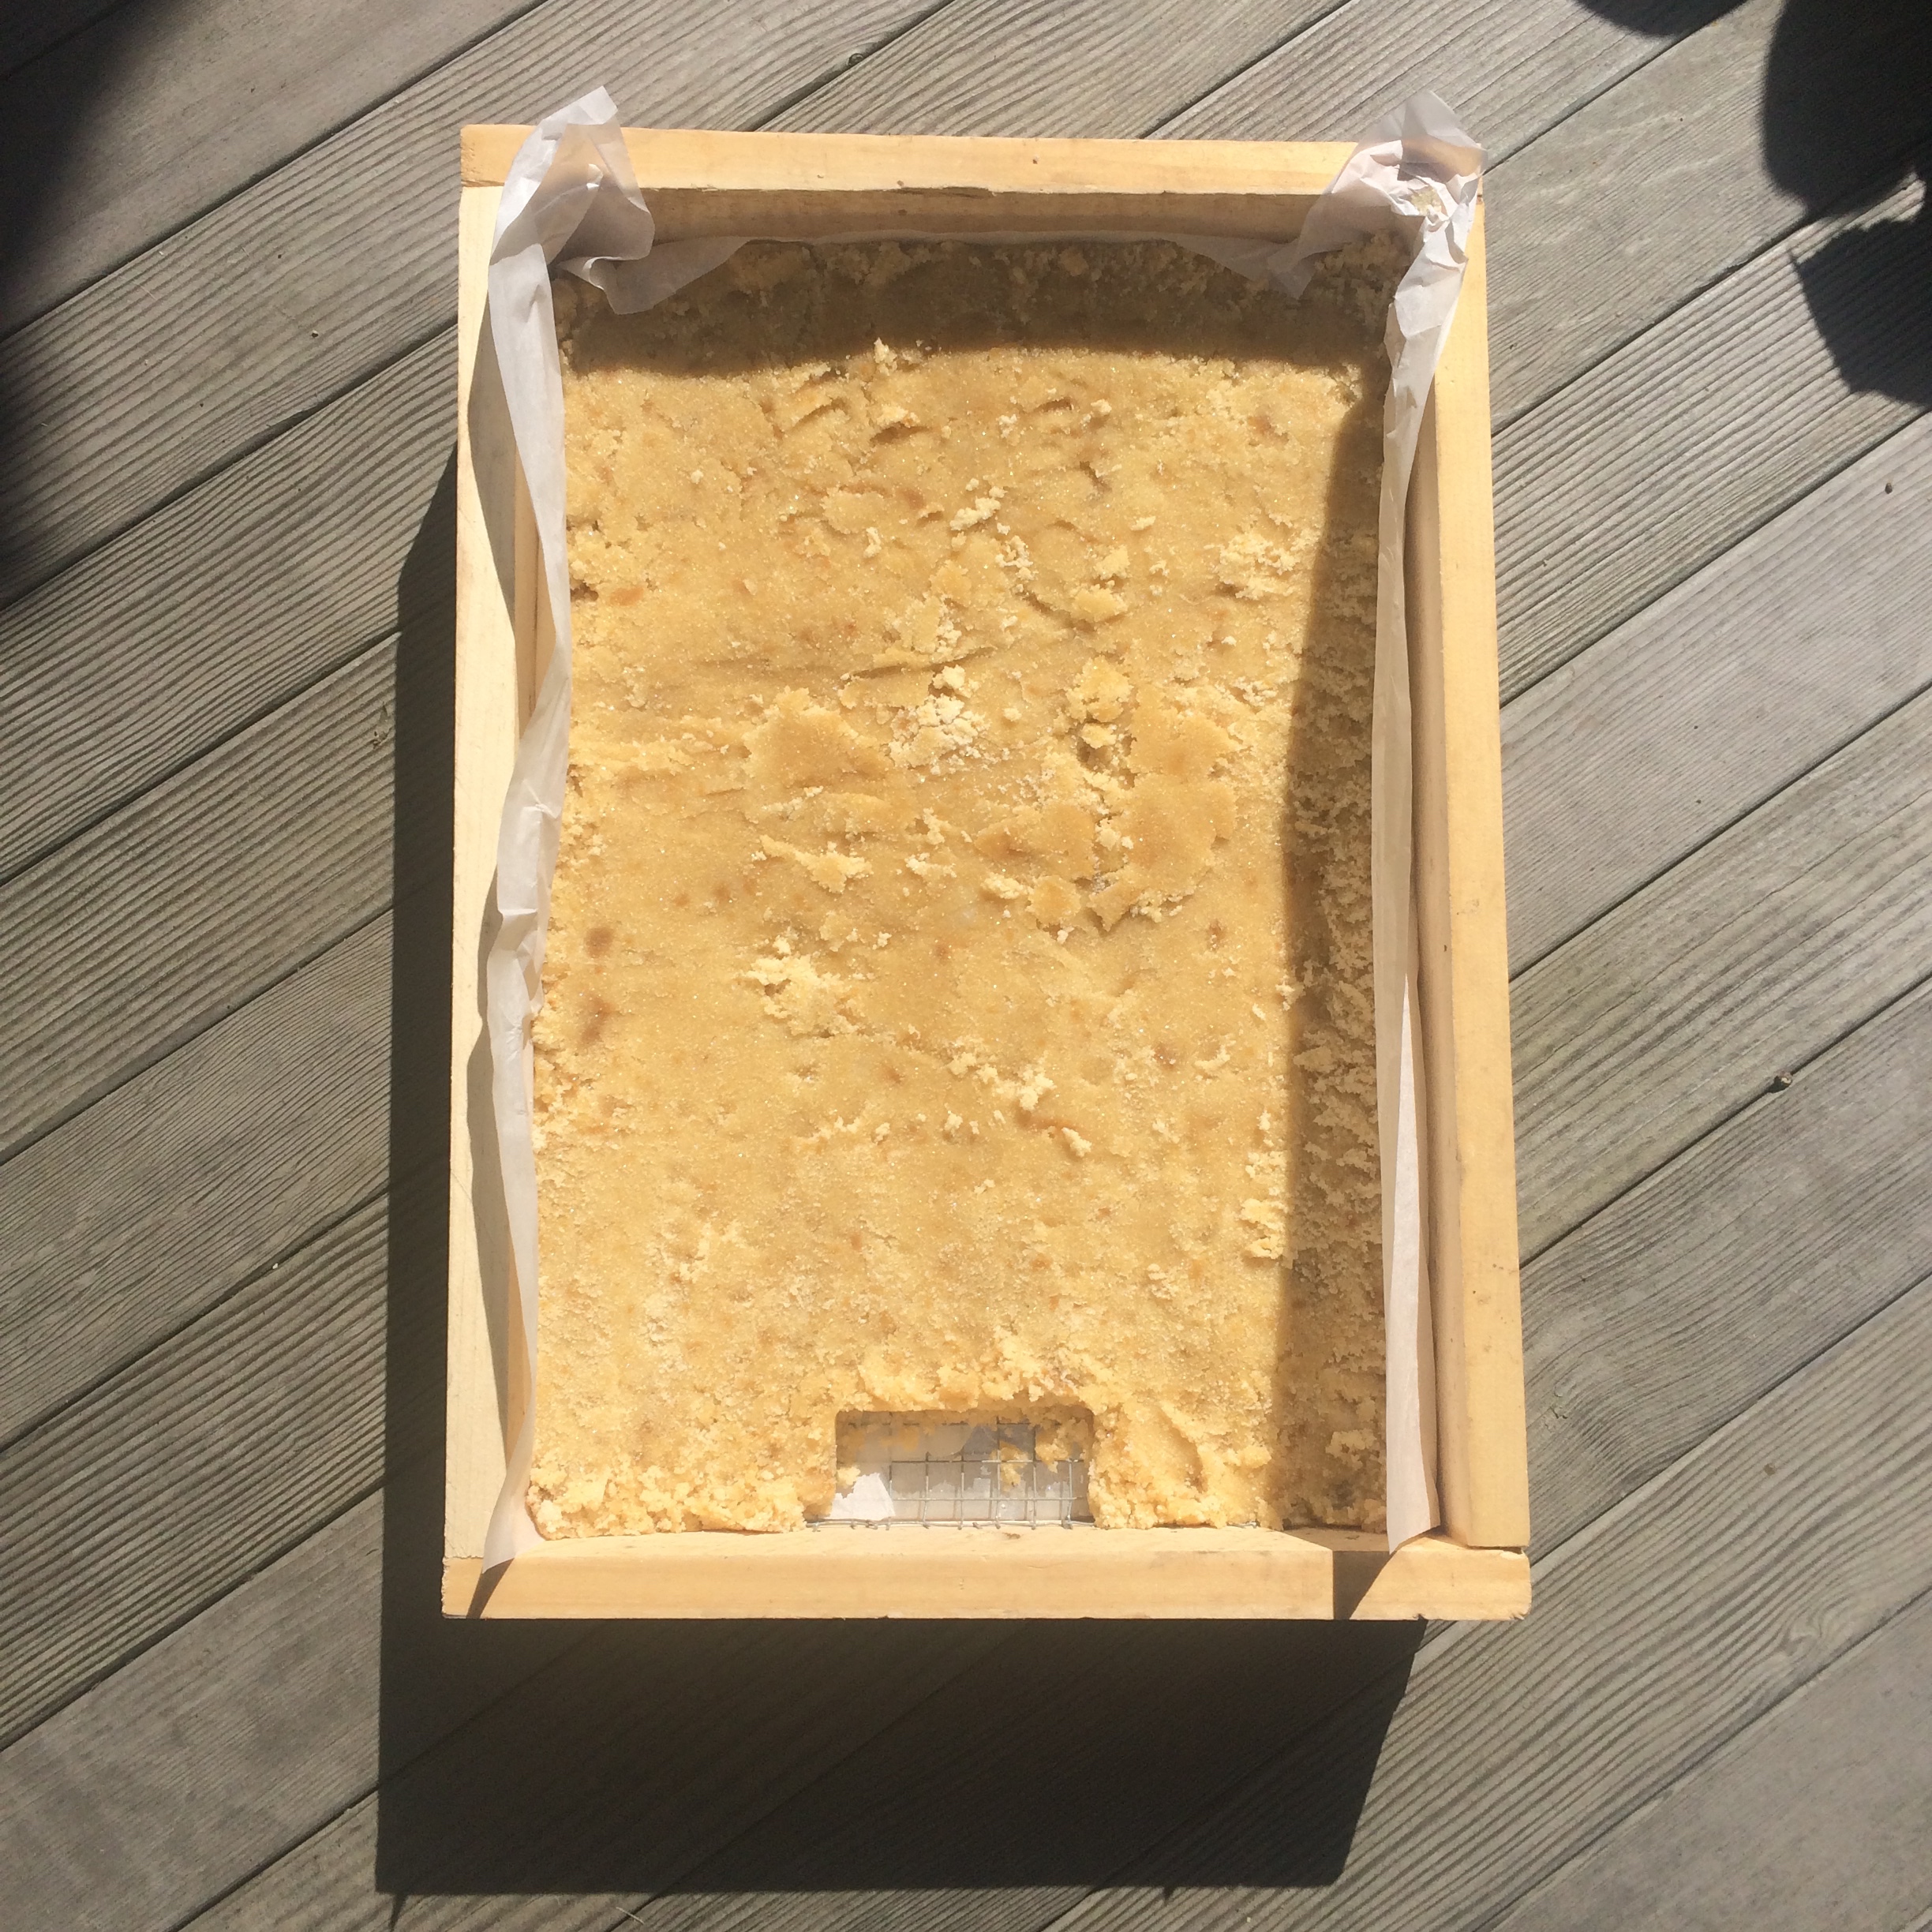
Now you need a place to put it. I like to create a “shim” – a wooden box about 2 inches high that as a 3/8 inch hole drilled on one side. The bottom of the shim is chicken wire which has holes more that big enough for a bee to crawl though. You can see the lattice of the chicken wire until the very thin paper I use to line the bottom of the shim. The paper is optional, but it really helps hold in the candy, and the bees will chew though it. For that reason, I don’t use paper with ink (no newspaper). I’d even like to use unbleached paper if I could easily find it.

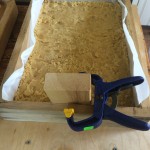
Note at the end of the shim, I have the 3/8 inch hole blocked with a block of wood. This is so when I fill the shim with candy, that it doesn’t go all the way against the side and block the hole. I’m using a small clamp to hold the block in place, but it easy removed once the candy has dried.

Now spoon the mixture into the shim and flatten it out. It doesn’t need to be perfectly smooth, but it should fill the shim.

Candy board complete
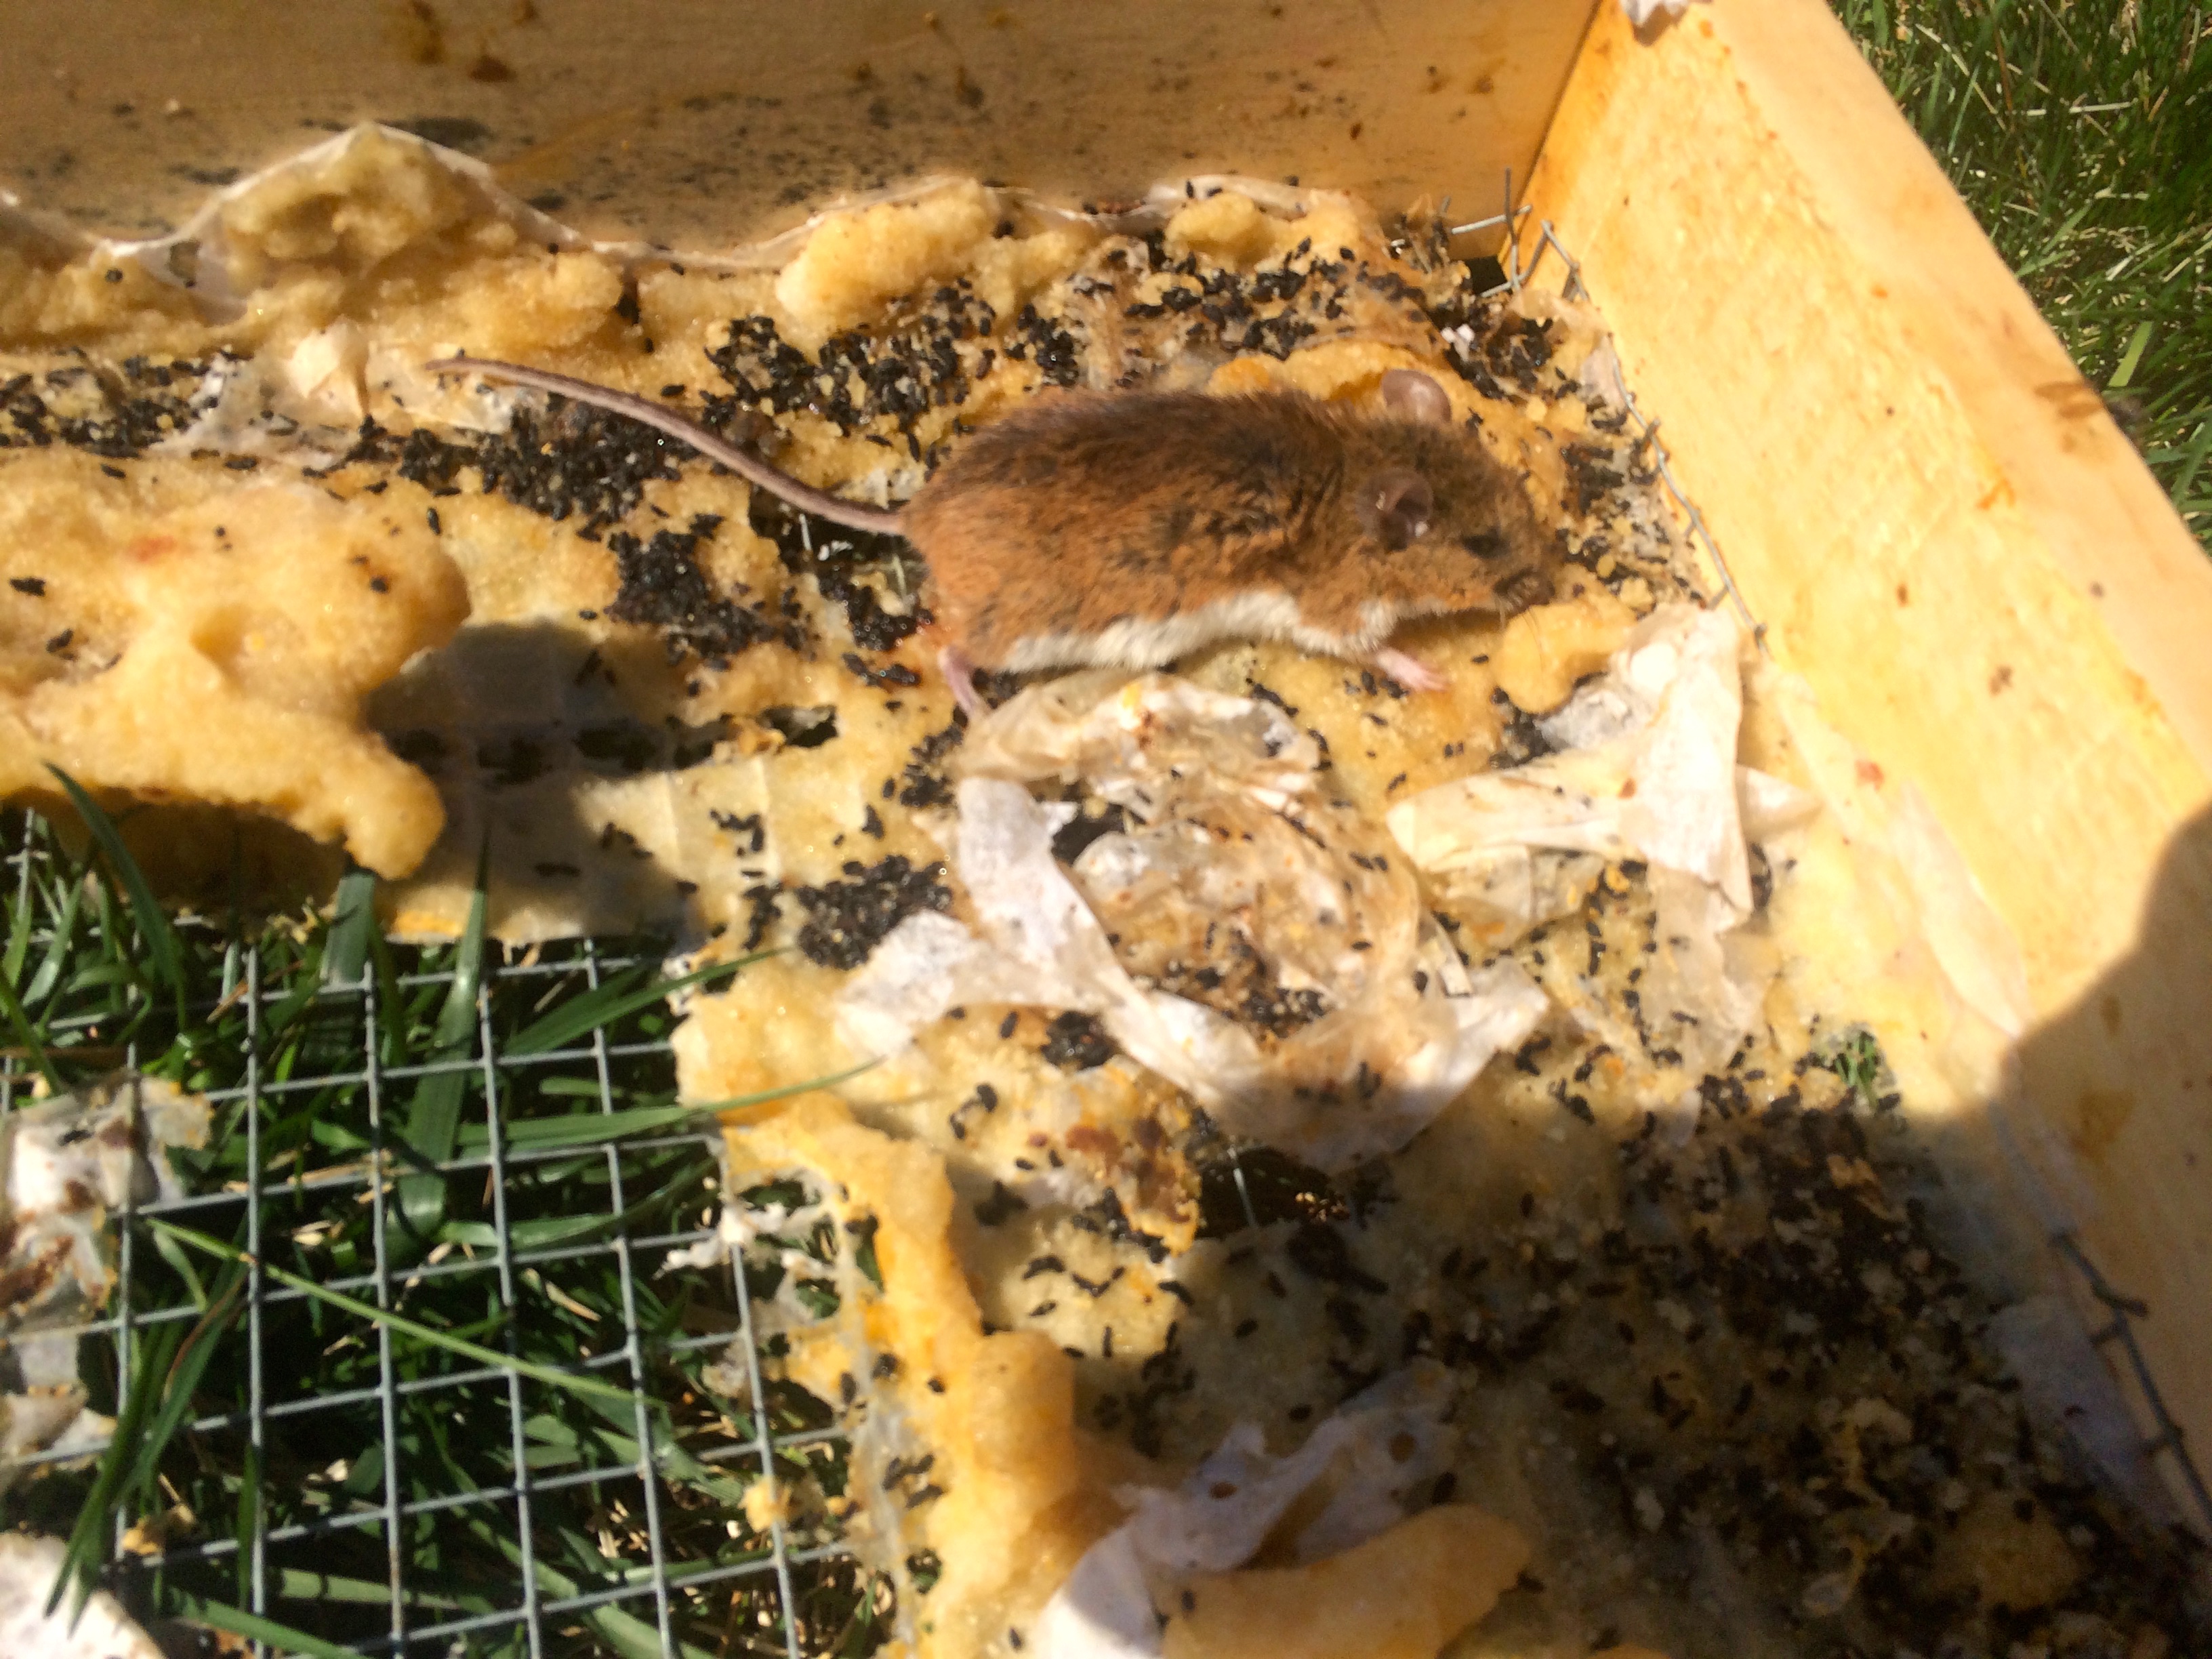
Now is the part where you need patience. Leave the soft candy in the shim for 48 hours. Yup, that’s a long time to wait, but it needs that time to dry out. I usually leave mine in the kitchen, but sometimes space can be a premium there, so move it to wherever you want, but remember you are leaving out sugar, and any little critters in your house will have found a feast. For that reason, I’d recommend covering it with a cutting board to keep out mice, pets and curious children. And no, there’s nothing poisonous here, you are gong to feed it to your bees after all. If a pet or kid takes a bite, life goes on.

After it’s all dry, it should feel hard as ice cream right out of the freezer, or if you were so lucky as a child, as hard as rock candy, which it kinda is.

Note I have removed the wooden block and you can see the hole it left in the side of the frame. The 3/8 inch vent hole is right where the wooden block was, visible in the next picture.


Bees devouring the candy board
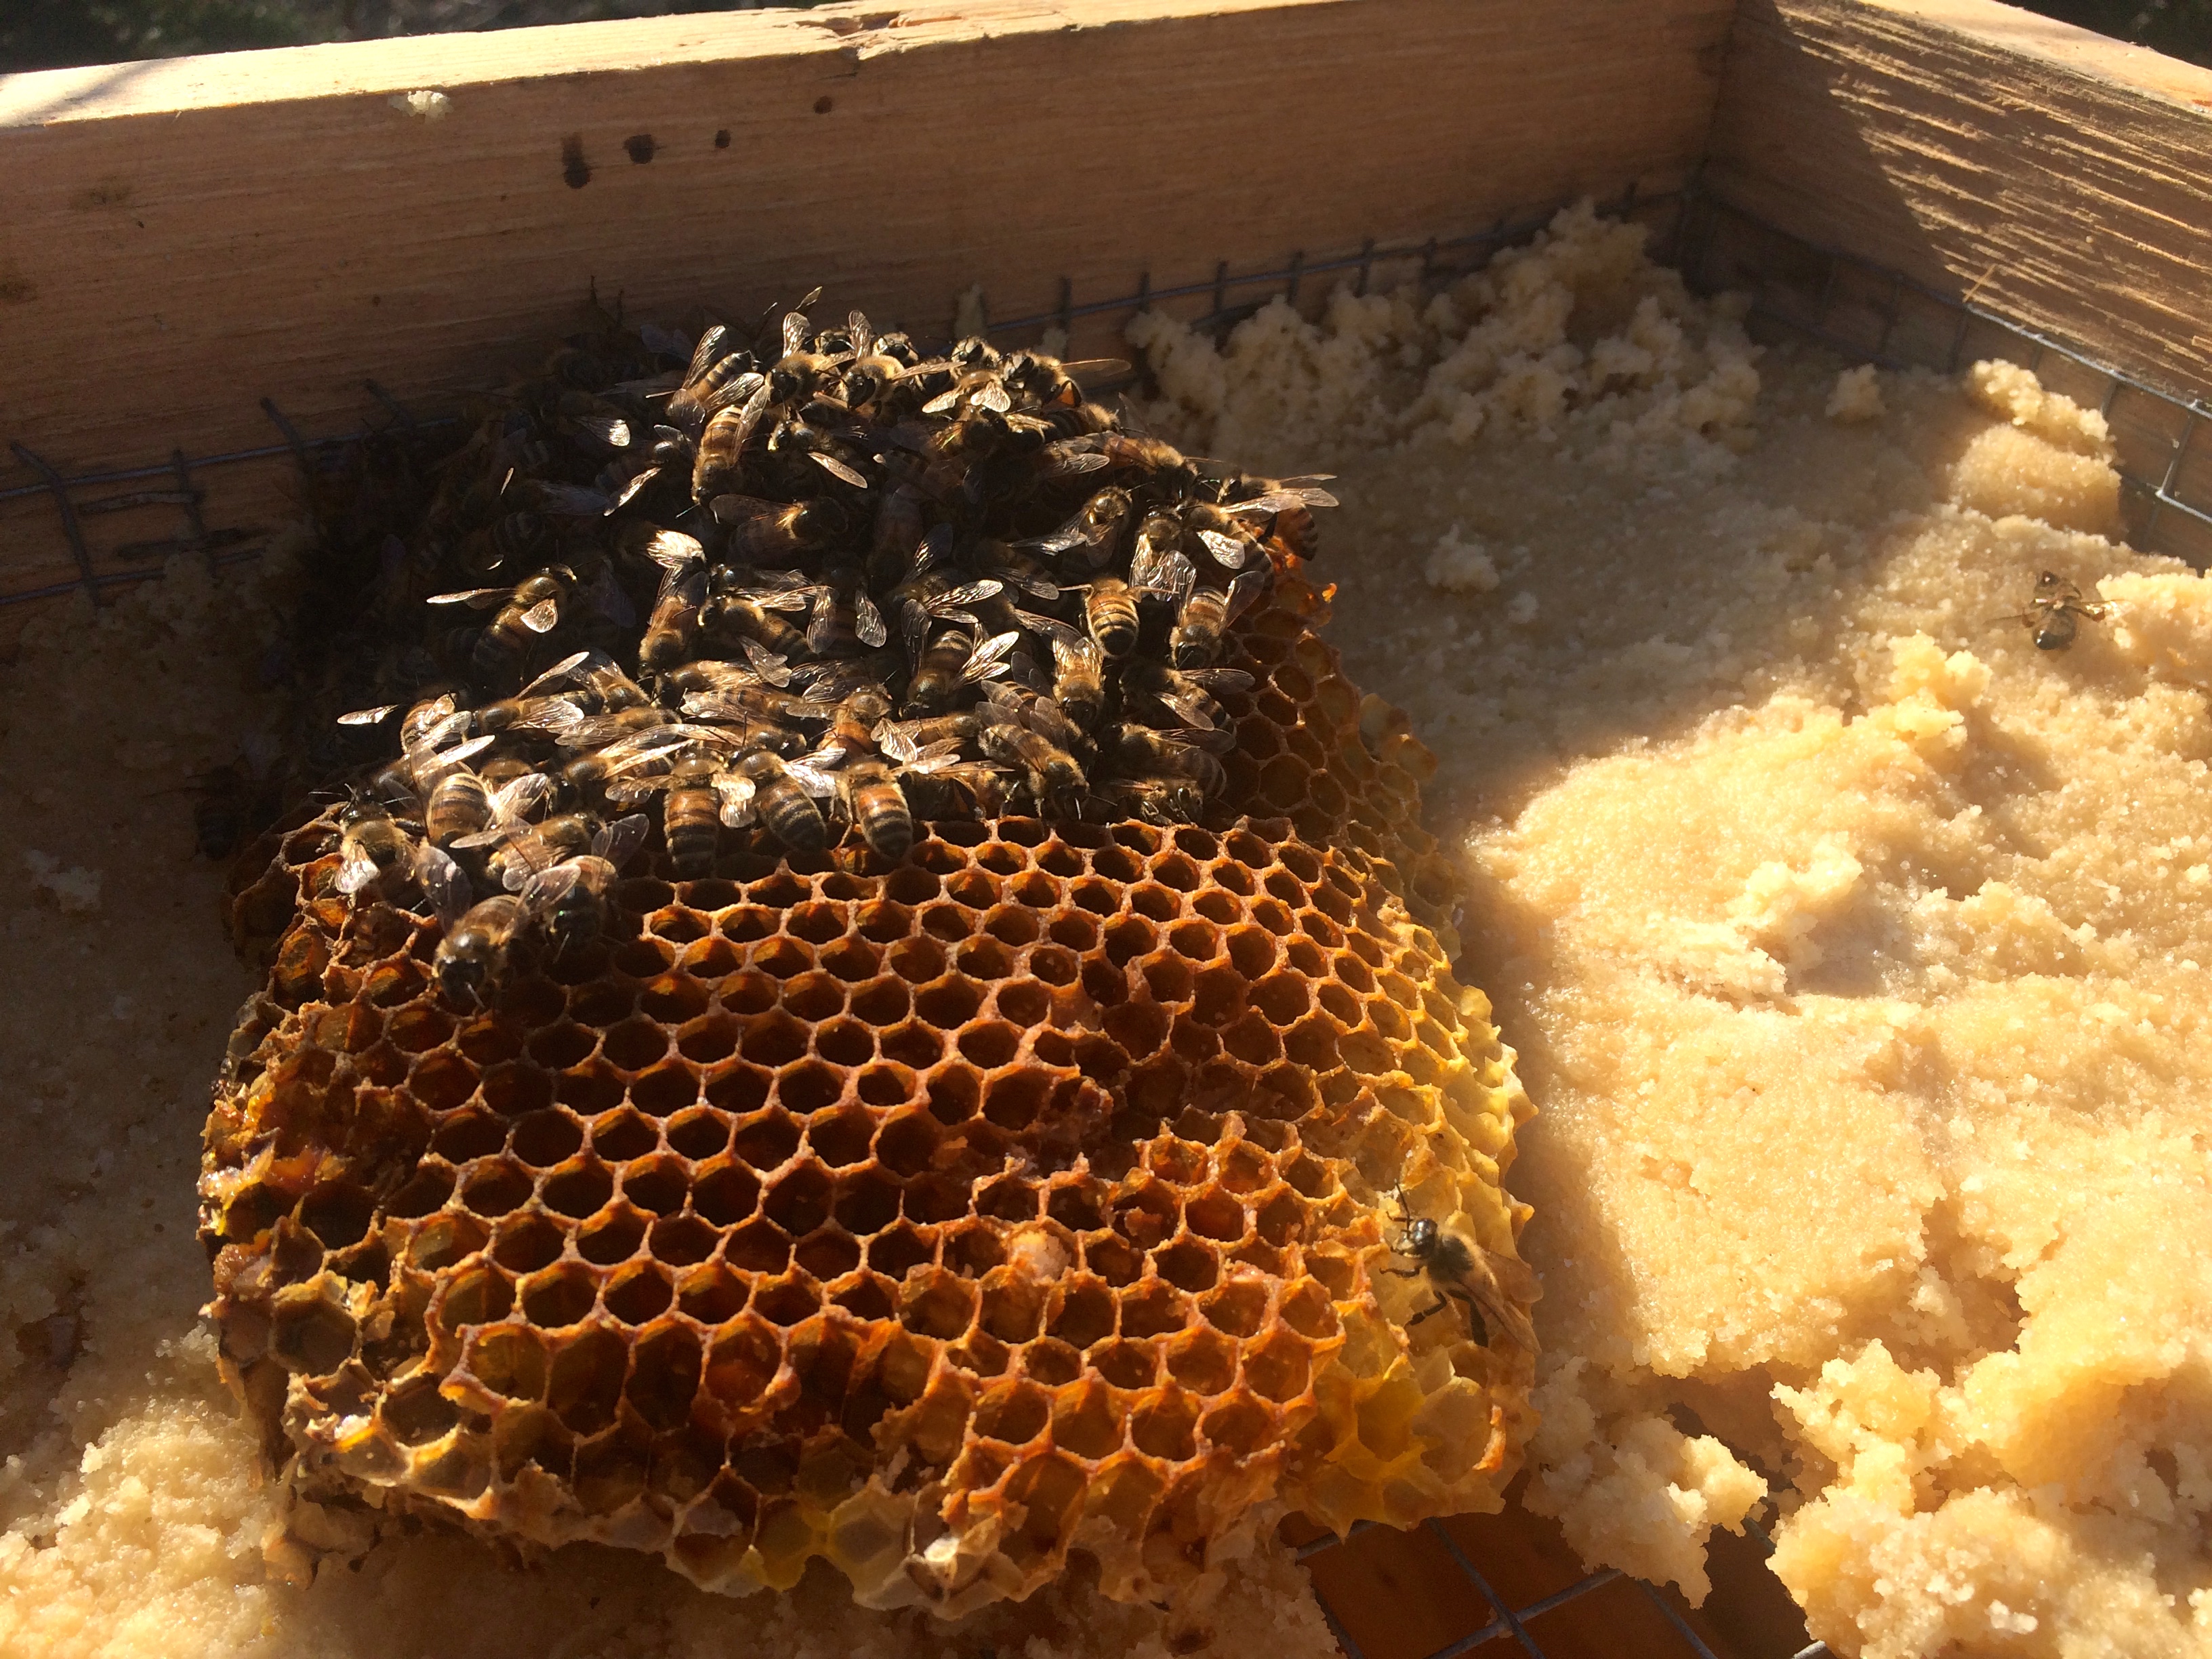
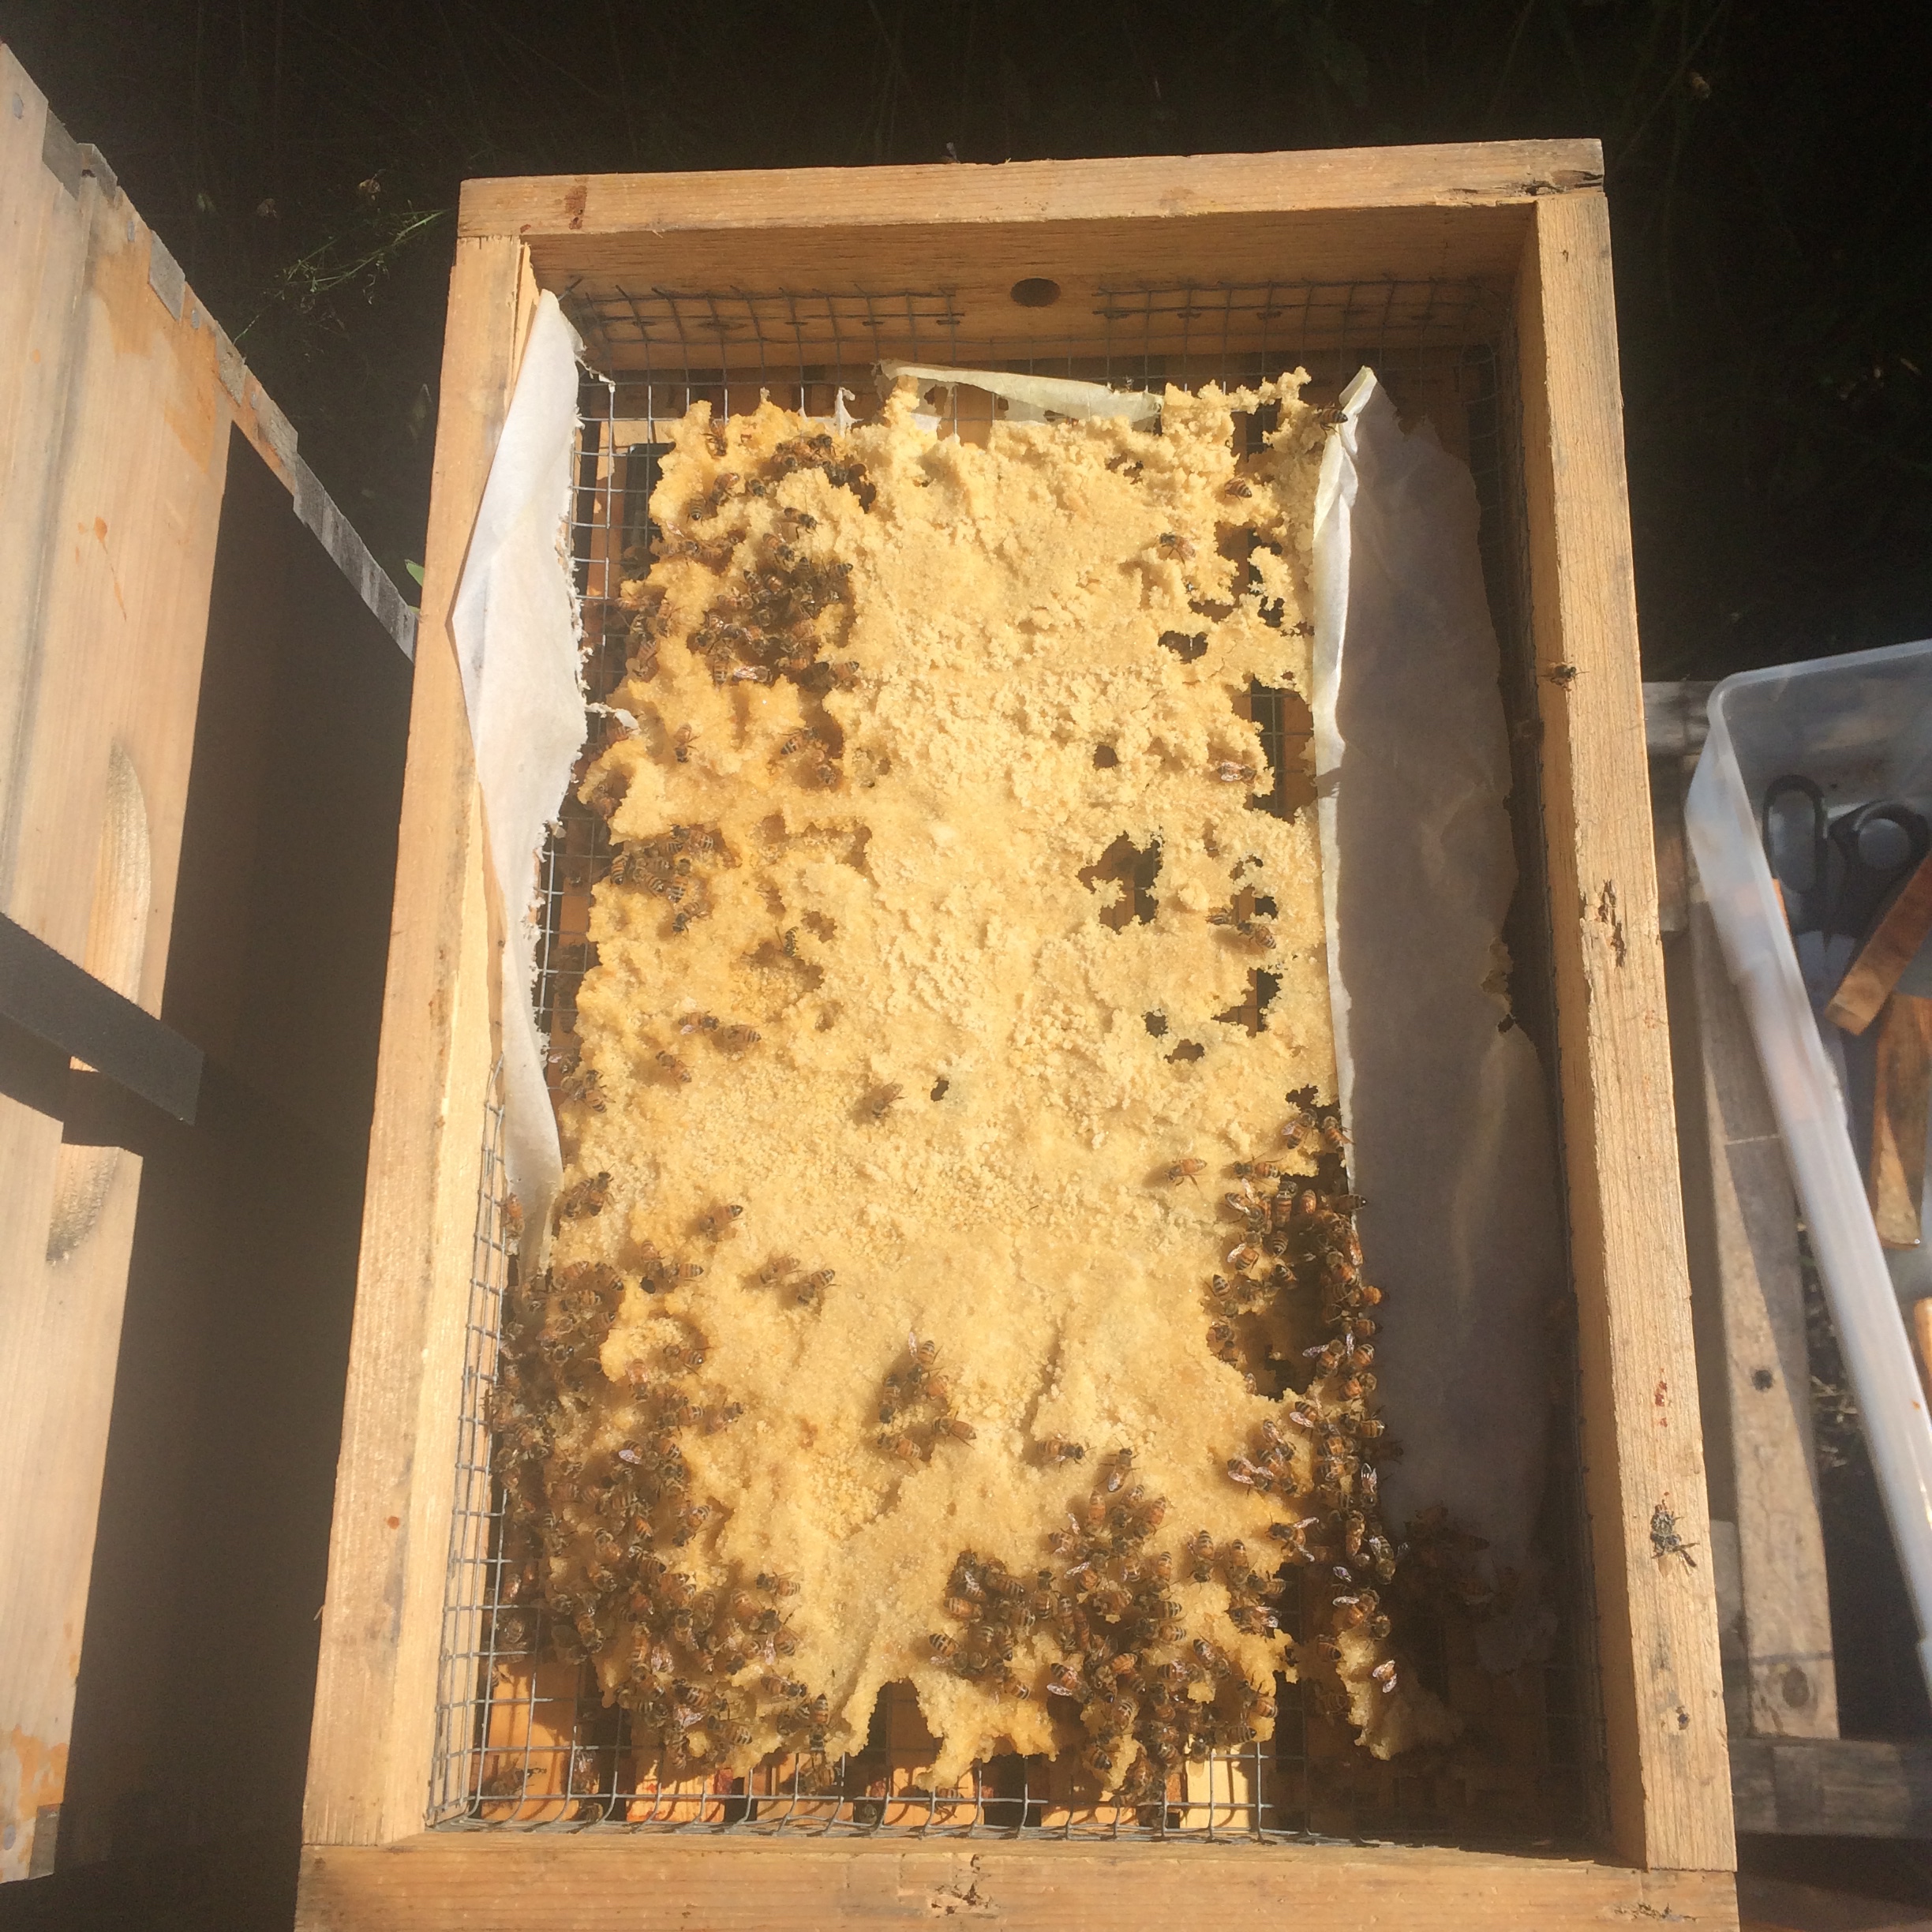
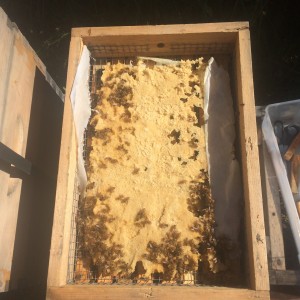
Now the fun part begins. You get to feed it to your bees. This picture is a month after I fed them in the fall. Even with some winter stores of honey, these bees are all over it. Remember, they’re opportunists, and close food is better food, especially in the fall after a lot of flowers have died.

Note the 3/8 inch vent hold on the side of the shim. They’ve already eaten enough of the candy to make it seem like the block of wood was never used.

Well feed bees are healthier bees. Feed your bees in the winter. Trust me.


¹MegaBee is a supplement, and being an organic beekeeper, I don’t like use these things, but for winter feeding I make an exception. Just feeding my bees sugar is as bad as a human only consuming sodas. Bees need protein (and other vitamins) just like we do.

² Sugar can get moldy, and a little vinegar in the mix will help keep this from happening. I’ve made it with vinegar and without, and honestly I can’t see a difference. your call on this one.

Categories: Bees | 1 Comment

Last Hive Standing

Inspection Feb, 7, 2015And doing amazingly well. I checked on the hive I combined from two into one last fall, and after the multiple storms we’ve had this year, they’re alive and kicking. I opened the top cover, and found, much to my surprise, that they were flowing out of the inner cover hole. A quick peek under the inner cover revealed a mass of bees on the fondant, all clinging to each other. I wasn’t wearing even wearing a veil, so I quickly put the inner cover down without even taking a photo of inside. The photo on the left is the outside of the inner cover. I’d say there were at least 1,000 bees inside the inner cover.

I’m sure they are up there for warmth, and taking advantage of the fondant I’ve left them as they had very little going into the winter. Perhaps building up for spring too? Possibly.

Healthy bees in February – wahoo!

33F, minimal winds today, and another snow storm is on its way. They’ve already survived 70 mph winds and 20″ of snow last week. These ladies are tough. You go girl(s)!

Categories: Bees | 1 Comment

With Much Sadness I Report…

Dead bees on the frame

Dead bees on the frame

Although everything looked fine just a few weeks before, I put my ear to one of my hives this morning and heard nothing. Not the tell-tale swish of the ocean, not a far away hum. Nothing.

I steeled myself for the inevitable, and muttering no-no-no in a hushed tone, I opened the hive. It was still and lifeless; thousands of bees still clinging to the frames.

After talking to a local beekeeper about the incident, we think they died of starvation. While there was lots of sugar an inch from the frames, their local stores of honey were almost entirely gone. There was even a frame of bees “butt out”, indicating starvation.

The realization that I let them starve is depressing, but like all setbacks in beekeeping, I have vowed to learn from the experience, and move forward.

Thankfully I have another colony that’s doing well, and now I’m focusing on nurturing it until spring.

Categories: Bees | 1 Comment

Alive And Kicking Jan 2015

Hive 2's food left Jan 2, 2014

Decent amount of food left in hive #2

I’ve done my January check in, and both hives look alive. Typically sluggish as they are in the winter, but alive. At 41F today, and a mild winter so far (almost no snow and some Dec days above 50F), I think the two colonies will make it to the spring, and judging from experience, getting this far is a good sign. But, there can always be changes. Last year they were alive at this time, but died during an unseasonably bad cold snap for 4 weeks starting at the end of Jan.

Both colonies have a reasonable amount of extra food left over (a little less in hive #1). I’m not going to feed them today, but possibly next weekend when I have more time to make up their food.

Note for next winter: Have a spare set of feeding boards. This way I can make up a new set of candy, and swap the old candy board out for the new one in one move, thus having to open the hives only once to re-feed.

Categories: Bees | Leave a comment

What Type of Feeder Works?

Glass Feeder Up on Wooden Sticks

Glass Feeder Up on Wooden Sticks

In New England, we feed our bees. Not like it’s our special skill, most beekeepers do it, but in New England, where the summers are short, and the nectar doesn’t flow with regularity, feeding is almost a necessity. Remember though, that you’re feeding them sugar, which is not nectar or pollen. But that’s a topic for another post…

When you ask a beekeeper which feeder type works best, each one will tell you, with the voice of conviction, that they’ve tried them all, and only one works best. Well, that’s a load of crap.

There are many feeder types, and the one that works best is the one that works best for your bees – period. Each style has its pros and cons, and I’ve tried a few. I’ll share in the following posts which ones work best for my bees and my lifestyle but you should do some experimenting and see for yourself.

The one I’ve found that’s easy for my lifestyle, and my bees take to it, is the inverted pail feeder. The idea is that you get a bucket (I use clear mason jars) punch a few small holes in the top, fill it with syrup, and invert it. While it will leak quite a few drops when first inverted, the pressure will stop the leaking in a few seconds, and leave small droplets of syrup for your bees. It’s easy, not very messy, cheap to make, and since mason jars are clear, it’s very easy to see if they need to be refilled or if the syrup has started to mold. I use half-gallon mason jars with five holes punched in the top, and then set it upside down on two wooden strips of wood. The key is to keep the jar lid level to the ground, so make sure the wooden strips are the same height, and that they are about 1/2″ high. This leaves room for the bees to crawl under the jar and drink from the bottom. With each drop of syrup the drink, another one appears from the hole.

Now I point out that I like this type for my lifestyle because I am lazy. I love beekeeping, and will go to great lengths for my bees, but if the methods are too difficult, I quickly start cutting corners. For instance, I use a half-gallon jar because it’s big, and typically only needs to be changed out once a week in my climate. It clear, so with a quick peak under the hive top, I can see if it needs to be refilled. Easy for me to use, and it works for my bees, a win-win.

Glass Feeder in the Corner

Glass Feeder in the Corner

The downside is that you have to balance it on the two strips, and it may leak a little, especially when you first put it in the hive. I find the bees just lick up the small leaks, so that’s not a big deal for me. I also turn them upside down outside the hive, so the first few seconds of drippings land in the bushes, not the hive. They are glass, and heavy when full of syrup, so I suppose you could drop and shatter one which would be a big mess, but as of yet I haven’t broken one.

Another downside is the height. These types of feeders are placed on top of the inner cover, and without a feeder, the hive top goes snugly on top of the inner cover. With a half-gallon mason jar on top of two wooden sticks, it’s just too tall, so I’ve found a “deep” sized honey super box on top of the inner cover will raise the hive edge tall enough to clear the mason jar, and allow the top to be put back on. So, this type of feeder takes an extra deep sized honey super out of use by the bees. Not the end of the world, but it means your cheap feeder just got more expensive, and your hive just got taller.

In another post I’ll talk about the Miller type feeder. I’ve also tried it with good results, and it has a few advantages over the inverted pail style.

Categories: Bees | Leave a comment