On Cape Cod where I keep my bees, its cold in the winter, with temperatures dipping below freezing in December, and not rising above that until March. If your bees have tons of honey, they may make it though the winter, but if they don’t, you need to feed them. There are no alternatives. Most beekeepers, including myself, feed them even if they have plenty of honey. My favorite way to feed my bees is by making up a candy board, otherwise called “fondant” from the French. It’s just a slurry of sugar and water that’s dried out and forms a hard substance. Think of the icing on a cake, but dried out, so it’s very hard.
The idea with candy board is that you’re making a block of food right above the frames on the upper super. As the winter gets colder, the bees will move up into the upper super (or should do this), and be close to the food source. They break cluster in the frames, and crawl up to the top of the frames. They find a think sheet of paper and clearly smell the food. They nibble through the paper (easy work for a bee) and find a huge food source the other side. If they don’t need it they won’t take it, but trust me, in the deep winter, they take it.
Candy board isn’t hard to make, but it takes a little planning. Don’t expect do get it all done in an afternoon. The following is the method I use, but it’s certainly not the only method, or the best; I only claim it as the one I like.
A few notes before we get started. Making a candy board requires some simple woodworking, and then some simple mixing of ingredients in a bowl. There is no cooking or flames of any type in my recipe, so even a kid can do it.
Before you start mixing it up, make sure you have a bee hive shim to pour it into. A wooden one about 2 inches high should work, with a 3/8 inch hole to allow for some ventilation, and a bottom made out of chicken wire. The hole is optional if you have another hole at the top of your hive such as a inner cover has. If you don’t want to use a shim, you can use large flat tupperware container to dry the mixture in, pop it out of the tupperware, and place it directly on top of the frames in the hive. But as the bees eat it, it will crumble, and the bees won’t eat what’s fallen to the bottom until the spring – not very efficient.
Wooden shims are made once, and can be used year after year. Even the candy, if not all eaten by the spring, can be placed in tupperware for use next fall. If you keep moisture out of it, it rarely seems to spoil.
So let’s talk about making the candy. First we’ll start out with what you’ll need. When you’re done, you’ll have about 9lbs of candy.
- 8 lbs of sugar (add this in first)
- 1 Pollen patty or 1 cup of “MegaBee” powder
- 1.5 cups water
- 1 tbsp. plain white vinegar (optional)
- A big pot. I use a lobster pot (at least a 6 “)
- 1 Heavy duty metal spoon or garden trowel. A wooden one might break.
- Takes 48hrs to dry out before it’s ready – plan in advance.
Yes, I know 8 lbs of sugar (usually two bags, but check – some are 5 lbs) is a lot of sugar. But bees need two things, carbs and protein, and sugar will suffice as the carbs in a pinch. The water helps you mix it all together, and then the drying allows it to form a solid block.
Start by putting all the sugar in a large bowl, or in my case a lobster pot. Don’t use a small mixing bowl as this is a lot of ingredients. Add in a crumbled pollen patty, or 1 cup of MegaBee powder¹. Give it a few good stirs with a large, study, metal cooking spoon or a metal garden trowel. You’ll need some serious muscle to mix it when wet, so do it when it’s dry just to distribute the pollen or MegaBee powder.
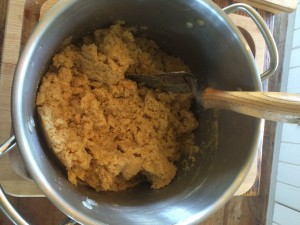
Next start adding in the water. I usually do 1/2 cup at a time, and then stir. Then add in the other cup of water (making 1.5 cups total) 1/2 cup at a time, and the vinegar² (optional). As you add in the liquid, you’re going to get a heavy paste, and it’s going to get a lot harder to stir. If you have a really strong kitchen mixer you can try it, but I do it by hand so I don’t break the mixer. Stir until all the water is absorbed by the sugar. When it’s ready, it should be as thick as wet sand.
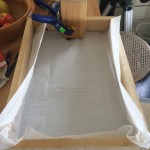
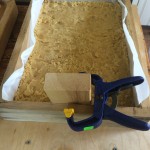 Now you need a place to put it. I like to create a “shim” – a wooden box about 2 inches high that as a 3/8 inch hole drilled on one side. The bottom of the shim is chicken wire which has holes more that big enough for a bee to crawl though. You can see the lattice of the chicken wire until the very thin paper I use to line the bottom of the shim. The paper is optional, but it really helps hold in the candy, and the bees will chew though it. For that reason, I don’t use paper with ink (no newspaper). I’d even like to use unbleached paper if I could easily find it.
Note at the end of the shim, I have the 3/8 inch hole blocked with a block of wood. This is so when I fill the shim with candy, that it doesn’t go all the way against the side and block the hole. I’m using a small clamp to hold the block in place, but it easy removed once the candy has dried.
Now spoon the mixture into the shim and flatten it out. It doesn’t need to be perfectly smooth, but it should fill the shim.
 Now is the part where you need patience. Leave the soft candy in the shim for 48 hours. Yup, that’s a long time to wait, but it needs that time to dry out. I usually leave mine in the kitchen, but sometimes space can be a premium there, so move it to wherever you want, but remember you are leaving out sugar, and any little critters in your house will have found a feast. For that reason, I’d recommend covering it with a cutting board to keep out mice, pets and curious children. And no, there’s nothing poisonous here, you are gong to feed it to your bees after all. If a pet or kid takes a bite, life goes on.
After it’s all dry, it should feel hard as ice cream right out of the freezer, or if you were so lucky as a child, as hard as rock candy, which it kinda is.
Note I have removed the wooden block and you can see the hole it left in the side of the frame. The 3/8 inch vent hole is right where the wooden block was, visible in the next picture.
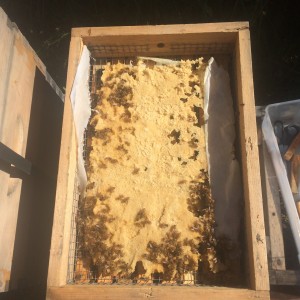 Now the fun part begins. You get to feed it to your bees. This picture is a month after I fed them in the fall. Even with some winter stores of honey, these bees are all over it. Remember, they’re opportunists, and close food is better food, especially in the fall after a lot of flowers have died.
Note the 3/8 inch vent hold on the side of the shim. They’ve already eaten enough of the candy to make it seem like the block of wood was never used.
Well feed bees are healthier bees. Feed your bees in the winter. Trust me.
¹MegaBee is a supplement, and being an organic beekeeper, I don’t like use these things, but for winter feeding I make an exception. Just feeding my bees sugar is as bad as a human only consuming sodas. Bees need protein (and other vitamins) just like we do.
² Sugar can get moldy, and a little vinegar in the mix will help keep this from happening. I’ve made it with vinegar and without, and honestly I can’t see a difference. your call on this one.

One Response to Making a Candy Board for Winter Feeding